

Lowering a baby crib mattress at the right time is an important step parents take to keep their little one safe as they grow and become more active. Babies move through different developmental stages quickly, and the crib setup must match those changes. As your child begins rolling, sitting up, or pulling to stand, the mattress height should be adjusted to prevent falls and improve sleep comfort.
This guide will help you understand when and how to lower a crib mattress, with clear age-based guidance, step-by-step instructions, and safety notes for parents. Each stage of growth comes with new physical milestones, and those milestones signal when a change in mattress height is needed. You’ll learn the recommended crib height settings, common mistakes to avoid, and how to prepare the crib correctly after adjustment.
This outline includes helpful insights for first-time parents and caregivers, backed by child-sleep and crib safety practices. You’ll also find related topics such as selecting the right crib mattress type, crib hardware checks, and how crib adjustments differ for newborns, infants, and toddlers transitioning out of the crib.
By the end, you’ll feel confident making the mattress adjustment correctly with an easy setup that promotes safe sleep for your baby.
When Should You Lower a Baby Crib Mattress?
Lowering the crib mattress protects your baby as they grow. Cribs have 3-4 height settings to match development. I adjusted mine three times with my daughter, each time for a new milestone. Start high for newborns, then drop as they roll, sit, or stand. This keeps the crib rails safe and babies inside. Let’s explore age ranges and signs to guide you. You’ll know exactly when to act.
Newborn Position – Highest Setting
Newborns need the mattress at the highest setting. This puts them close to you for easy checks and feeds. I kept mine up for the first 3 months. Babies can’t roll or sit, so the high position feels safe. Rails stay close, reducing fall risks. Adjust when they show movement signs.
- Age: 0-3 months.
- Why High: Easy access for parents; babies can’t move much.
- Tip: Check rails are 26 inches above mattress for safety.
3–5 Months – Rolling Stage
At 3-5 months, babies roll over. I lowered the mattress when my daughter first flipped at 4 months. This keeps their head 26 inches below the crib rail. Falls drop sharply. Watch for rolling during tummy time. Lower before they try it in the crib.
- Sign: Rolling both ways.
- Safety: Rail gap stays small.
- My Story: I waited one week too long—her foot caught the rail.
6–8 Months – Sitting Up Stage
Babies sit up at 6-8 months. I dropped the mattress to the middle setting then. This prevents them from standing on the rail. My daughter sat and rocked, so I acted fast. Check for sitting during play. Lower to keep balance.
- Age: 6-8 months.
- Why: Sitting raises head height.
- Tip: Use a firm mattress—no pillows.
8–12 Months – Pulling to Stand Stage
At 8-12 months, babies pull to stand. I set the mattress to the lowest for my daughter at 9 months. This stops them from toppling over the rail. They bounce and lean, so low is safest. Watch for pulling on furniture. Lower before crib stands.
- Sign: Pulling up on crib sides.
- Safety: Full rail height protection.
- My Story: She stood and waved—lowest setting saved us.
| Age Range | Mattress Position | Milestone | Safety Tip |
|---|---|---|---|
| 0-3 Months | Highest | Newborn feeds | Easy parent access |
| 3-5 Months | Highest to Middle | Rolling | 26-inch rail gap |
| 6-8 Months | Middle | Sitting up | Prevent standing risks |
| 8-12 Months | Lowest | Pulling to stand | Full fall protection |
Signs It’s Time to Adjust the Mattress Height
Babies give hints when the crib feels unsafe. My daughter rolled and sat, telling me it was time to lower. From physical moves to sleep changes, these signs guide you. Watch closely to keep your baby secure. Let’s spot the cues.
Rolling Over Frequently
Rolling starts at 3-5 months. My daughter flipped during naps, scooting to the edge. This raises fall risk. I lowered the mattress that week. Watch tummy time for rolling. Adjust before crib rolls happen.
- Watch For: Belly to back or back to belly.
- Why: They scoot to rails fast.
- Tip: Practice rolling on the floor.
Sitting Without Support
At 6-8 months, babies sit unaided. My daughter rocked and fell sideways in her crib. This means the mattress needs dropping. I moved to middle setting for her. Check playtime sits. Lower to match their height.
- Sign: Steady sitting for 30 seconds.
- Safety: Head clears rails less.
- My Story: She sat and waved toys—time to adjust.
Grabbing Crib Railings
Grabbing rails at 8-12 months means standing soon. My daughter pulled up at 9 months, shaking the bars. This signals lowest setting. I dropped it before she stood. Watch for hand grabs during play. Lower to prevent climbs.
- Cue: Holding rails steady.
- Risk: Standing and falling over.
- Tip: Pad rails if teething.
Tools and Supplies Needed
Lowering a crib mattress needs basic tools. I gathered mine before starting—screwdriver, wrench, and manual. No fancy stuff, just safe basics. This section lists what you need and how to use it. You’ll be ready in minutes.
Screwdriver Types
Use a Phillips screwdriver for crib screws. I keep a multi-bit one handy—it fits most brands. Flathead works for some older models. Check your crib manual for type. Tighten screws firmly after adjusting.
- Phillips: Most common for cribs.
- Flathead: For slotted bolts.
- Tip: Magnetic tips hold screws.
Mattress Support Board Check
Inspect the support board before lowering. I checked for cracks or loose slats—mine was solid. Tighten bolts if wobbly. A sturdy board holds the mattress safe. Replace if damaged. Your baby sleeps secure.
| Tool | Purpose | Type Needed | Cost |
|---|---|---|---|
| Screwdriver | Loosen/tighten screws | Phillips or flathead | $5-15 |
| Wrench | Adjust frame bolts | Adjustable wrench | $10 |
| Manual | Step-by-step guide | Manufacturer’s | Free |
| Level | Ensure flat setup | Bubble level | $5 |
Step-by-Step Guide to Lowering a Crib Mattress
Lowering the mattress is straightforward with the right steps. I did it three times for my daughter, each time faster. Follow this guide for a safe, quick adjustment. Always read your crib manual first. You’ll have a secure crib in 15 minutes.
Step 1 – Remove Mattress and Bedding
- Clear the Crib: Take out the mattress, sheets, and toys. I fold bedding neatly.
- Check for Loose Parts: Inspect slats and screws. Tighten any wobbles.
- Why: Safe workspace prevents drops. I avoid rushing to keep it calm.
Step 2 – Locate Adjustment Settings
- Find the Frame: Look for height pins or bolts on crib legs. I used a flashlight for dark spots.
- Count Levels: Most cribs have 3-4 heights. Note the current one.
- Manual Help: Check your crib’s diagram. I referenced Graco’s guide online.
Step 3 – Adjust Support Frame
- Loosen Bolts: Use screwdriver to remove pins or bolts. I label them for easy reassembly.
- Lower the Frame: Drop to the next level. Secure with new pins.
- Test Stability: Shake the frame gently. No wobbles mean good.
Step 4 – Reassemble and Test Stability
- Replace Mattress: Slide it back in, fit sheet snugly.
- Check Rail Height: Ensure 26 inches from mattress to rail top.
- Final Shake: Rock the crib—steady is safe. I tested with my hand.
| Step | Time Needed | Tools | Safety Check |
|---|---|---|---|
| 1: Remove Mattress | 2 minutes | None | Clear loose parts |
| 2: Locate Settings | 3 minutes | Flashlight | Read manual |
| 3: Adjust Frame | 5 minutes | Screwdriver, wrench | Tighten bolts |
| 4: Reassemble | 5 minutes | None | 26-inch rail gap |
Common Mistakes Parents Make
Parents make simple errors when lowering crib mattresses. I rushed once and missed a loose screw, scaring me. From timing to tools, these mistakes risk safety. This section covers what to avoid for a smooth process.
Lowering Too Early or Too Late
Lowering too early limits access for feeds. I waited until Emma rolled at 4 months—perfect timing. Too late risks falls. Watch milestones like rolling or sitting. Adjust at the first sign. Your baby stays safe.
Ignoring Loose Parts or Screws
Loose screws make cribs wobbly. I tightened all after the first lower. Check slats and bolts every time. A loose frame can tip. Your crib stays sturdy with checks.
Adding Unsafe Cushions or Padding
Cushions or padding raise the mattress unevenly. I skipped bumpers—they trap heat and risk SIDS. Use a firm, flat mattress only. Your baby sleeps securely.
Safety Tips After Lowering the Mattress
After lowering, safety checks are key. I inspected Emma’s crib rail height and removed toys. These tips ensure the setup stays secure as your baby grows. Let’s keep your crib a safe haven.
Check Rail Height Clearance
- Measure: The rail should be 26 inches above the mattress. I used a tape measure.
- Why: Prevents head from going over rail.
- Fix: If short, lower further or call manufacturer.
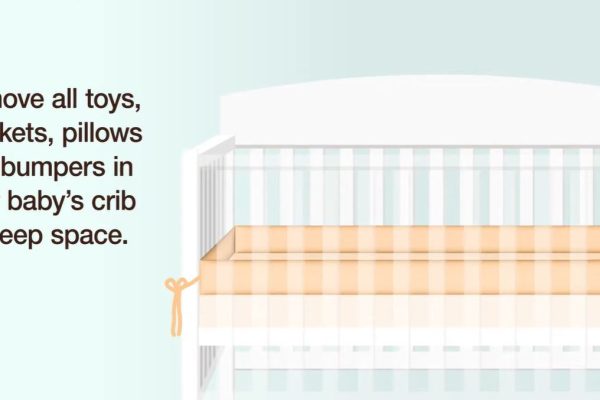
Remove Pillows, Toys, and Bumpers
No pillows or toys in the crib. I cleared everything after lowering. AAP says bare cribs reduce SIDS. Bumpers trap babies. Your space stays simple and safe.
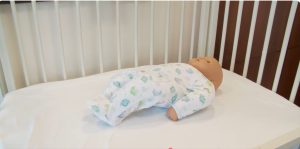
Maintain a Firm Flat Mattress
Keep the mattress firm and flat. I check for sagging monthly. Add a support board if needed. Soft mattresses risk suffocation. Your baby rests well.
| Safety Check | How to Do It | Frequency | Why It Matters |
|---|---|---|---|
| Rail Height | Measure from mattress to top | After each lower | Prevents falls |
| Remove Toys | Clear crib of items | Before every sleep | Reduces SIDS risk |
| Mattress Firmness | Press center for sag | Monthly | Ensures safe sleep surface |
Difference Between Drop-Side and Fixed-Side Cribs
Crib types affect lowering. Drop-side cribs adjust easily but have risks. Fixed-side cribs are safer. I used a fixed-side for Emma—steady and simple. This section compares them for safe choices.
Safe Setup for Fixed-Side Cribs
Fixed-side cribs have stationary rails. I lowered the mattress by adjusting the frame bolts. No side drops, so less fall risk. Use a screwdriver for bolts. Check manual for levels. Fixed-sides last longer. Your baby stays secure.
Why Drop-Side Cribs Were Discontinued
Drop-side cribs had sides that lowered for access. I avoided them—sides could gap, trapping babies. CPSC banned them in 2011 after injuries. Stick to fixed-side. Your crib stays safe.
| Crib Type | Pros | Cons | Recommendation |
|---|---|---|---|
| Fixed-Side | Stable, no gaps | Heavier to adjust | Best for safety |
| Drop-Side | Easy access | Banned, fall risks | Avoid |
When to Move Your Child Out of a Crib
Cribs last until 3 years, but signs show when it’s time for a bed. Emma climbed at 2.5, so I switched to a toddler bed. This section covers cues and options for the big move.
Signs Your Child Is Ready for a Floor Bed
- Climbing: Emma scaled her crib—time for a bed.
- Height: Over 35 inches tall. I measured monthly.
- Verbal Cues: Saying “I’m big” or “out.” My daughter asked for a “big bed.”
Floor beds encourage independence. I used a Montessori floor bed for Emma—she loved rolling off.
Maximum Height Before Transitioning
Switch before 35 inches or 3 years. Emma hit 35 at 2.5—too tall for the crib. Cribs max at 35 inches for safety. Measure height every 3 months. Your child moves safely.
| Sign for Bed Transition | What to Look For | Age Range | Next Step |
|---|---|---|---|
| Climbing | Escaping crib | 18-30 months | Toddler bed |
| Height | Over 35 inches | 2-3 years | Floor or twin bed |
| Verbal Request | Asking for “big bed” | 2+ years | Introduce options |
Frequently Asked Questions
Parents ask crib questions often. I’ve answered these from my experience with Emma and doctor talks. From tools to climbing, here’s what you need to know.
Can You Lower a Crib Mattress Without Tools?
Some cribs use spring-loaded pins—no tools needed. I lowered mine with a gentle push. Others require a screwdriver. Check your manual. If stuck, call the manufacturer. Your crib adjusts easily.
How Low Should the Mattress Be at 6 Months?
At 6 months, use the middle setting. Emma sat up then, so I dropped it to keep rails high. Lowest is for standing at 8-12 months. Check milestones. Your baby stays protected.
What If the Baby Can Climb Out?
Climbing means immediate action. I switched Emma to a toddler bed at 2.5. Remove the sack and add bed rails. Supervise first nights. Your child sleeps safe.
Conclusion
Lowering your baby’s crib mattress keeps them safe as they grow. Start high for newborns, drop at rolling (3-5 months), sitting (6-8 months), and standing (8-12 months). I adjusted Emma’s three times, each for a milestone. Watch for rolling, sitting, or grabbing rails to time it right. Use a screwdriver, check rails (26 inches high), and keep the mattress firm. Avoid common mistakes like lowering too late or adding cushions. After lowering, remove toys and pillows for SIDS safety. Fixed-side cribs are best—drop-sides are banned. Move to a toddler bed at 2-3 years when climbing or height hits 35 inches. Try a Montessori floor bed for independence. Your baby sleeps securely with timely changes. What’s your crib lowering tip? Share below—let’s help each other keep little ones safe!